วันพุธที่ 24 ตุลาคม พ.ศ. 2550

การสร้างตัวติดตั้งแบบเร่งด่วน

Are you not satisfied with the zip bundle thats generated out of your module suite from Netbeans? Are you looking for an easy way of generating installers for suite projects right inside the Netbeans IDE?

Well, here it is..a plugin based on openInstaller installer framework that does just this. openInstaller is an extendable, cross-platform, multi-home install and customizable installer framework. All you have to do after installing the plugin is :

  1. Configure your module suite to be 'standalone'. This is required to generate an installer. The plugin will assist you in this if you have not configured your module suite project yet.
  2. Choose the Generate suite installer button on the toolbar (with CD icon). This will bring up the wizard.
  3. Enter the basic details about your application (like, name, version, system requirements and license).
  4. When you click Finish on the wizard, the plug-in will generate an installer and keeps it under 'dist' folder. There are three zip files in that folder : one module suite zip (generated by Netbeans, as before), -binary.zip is the generated installer (you can rename this to any name you want and -source.zip which contains the source files for the installer. The latter can be used in upcoming openInstaller IDE to customize the generated installer.
  5. Distribute -binary.zip bundle and unzip on the target machine and execute the launcher script specific to your platform (There's one for all *NIX and one for windows).

Download the plugin from this update center. (you need to manually configure this update center in your Netbeans IDE. If you do not know how to do this, go here. Look into the first part and use this update center link.

More information (in the form of FAQ) about the plugin is here.

You really have to see this flash demo which shows how easy is to generate an installer for your module suite application.

Disclaimer: The module described here are purely experimental (alpha version), so no guaranties. Use at your own risk.

Below are the screenshots of the plug-in actions..

The screenshots show the process of generating installers for the FeedReader suite sample that comes with Netbeans IDE

http://blogs.sun.com/vdblog/entry/netbeans_module_suite_installer_generator

วันเสาร์ที่ 13 ตุลาคม พ.ศ. 2550

Component Palette คืออะไร เอาไว้ทำอะไร

ผมได้อธิบายถึง Code snippet ซึ่งในที่นี้เราก็จะมาทำให้เป็นในรูปแบบ palette palette หมายถึง อะไรที่อยู่ด้านข้างของ GUI หรือ editor แล้วทำเป็น รูปไอคอนเพื่อให้เราเห็นรูปแล้วเข้าใจว่ามันคืออะไร
เมื่อเราลากมาใส่ใน code เราก็จะได้ code ที่เขียนเสร็จแล้ว อยู่ใน code ของเรา
การ สร้าง อยู่ในลิ้งนี้นะครับ และควรอ่าน code snippet ก่อนด้วยนะครับ

http://platform.netbeans.org/tutorials/nbm-palette-api2.html

วันอาทิตย์ที่ 7 ตุลาคม พ.ศ. 2550

NetBeans Code Snippet สร้าง Code สำเหร็จรูปเอาไว้ใช้

Code Snippet คืออะไร ?
เรามาทำความเข้าใจไอ้เจ้า Code Snippet เมื่อเราเขียนโปรแกรมภาษาใดเรามักจะลืม คีย์
เช่น private,public,protec ,class ,implement ,extens และอื่นๆ ซึ่งทำให้เรานั้นเสียเวลา
ไปกับการเอาหนังสือมาเปิดดูว่ามันเขียนยังไง แล้วมีไว้ใช้ทำอะไร แต่ถ้าสร้างขึ้นมาเองก็จะสามารถ
ใส่คำอธิบายเอาไว้ซะเลยครับ เพื่อสะดวกกับการทำงานของเราเวลาและความคิดที่เราทำงานอยู่จะไม่ได้
สะดุดครับ
เราใช้มันอยู่แล้วละครับ พวกเวลา class.xxxx xxx ที่แสดงขึ้นมานั้นก็คือ Code Snippet ที่มีการท่องเข้าไปใน
API Class เราทำได้หลายแบบ ครับถ้ามีเฉพาะ คีย์ตัวเดียวเราจะทำปุ่มลัดเอาครับ แต่ถ้ามันเยอะหน่อยก็จะทำแบลากวางครับ
เรามาสร้างกันดีกว่าครับ เราจำเป็นต้องใช้ NetBeans Palette API มีอยู่แล้วใน Netbeans ครับ
ในที่นี้เราจะมาสร้างแบบ ใหญ่คือแบบที่ไม่ใช่คีย์ครับ เราจะเริ่มไว้ก่อนครับ เพราะเราจะพัฒนาเป็นแบบ GUI อีกทีครับ
เราจะใส่อะไรให้มันบ้างครับเวลาที่เราจะสร้างมันขึ้นมา
  • Java class ที่เอาไว้กำหนดระยะ code เมื่อ dragged ใส่เข้าไปใน Source Editor.
  • ชื่อที่เอาไว้แสดง palette item.
  • คำอธิบาย palette item.
  • 16x16 pixel image 'ไอคอนขนาดเล็ก' เมื่อแสดงผล
  • 32x32 pixel image 'ไอคอนขนาดใหญ่' เมื่อแสดงผล
ต้องมีการแก้ไข layer.xml ด้วย

ติดตั้ง Software

  • NetBeans IDE 6.0 (download)
  • Java Standard Development Kit (JDK™) version 1.4.2 (download) or 5.0 (download) or later

    ตัวอย่างการติดตั้ง
    ทำตามขั้นตอนต่อไปนี้
  1. Unzip the attached file.
  2. เปิด IDE, เลือก File > Open Project and browse to the folder that contains the unzipped file. Open the module project. It should look as follows:

    เอาไว้จะแปลความต่อนะเหนื่อยละเข้าไปดูในนี้ก่อนก็ได้ครับ http://platform.netbeans.org/tutorials/60/nbm-palette-api1.html


Generics คืออะไร ?

การจัดเตรียมโครงสร้างของชนิดข้อมูลที่มากกว่าชนิดข้อมูลนั้น คล้ายๆ array แต่ไม่ได้ระบุ เพิ่มได้เรื่อยๆ
ความสามารถในการส่งข้อมูลของ Interface และ Method ได้
การสร้าง Generics Class:
LinkedList
E คือชนิดข้อมูลไม่ว่าจะเป็น premetive หรือ reference
เป็นชนิดข้อมูล ย่อยที่อยู่ใน Linkedlist
ตัวอย่างรูปแบบการสร้าง
public class LinkedList
extends AbstractSequentialList
implements List, Queue, Cloneable, java.io.Serializable{
private transient Entry header = new Entry(null, null, null);
private transient int size = 0;
public E getFirst() {
if (size==0) throw new NoSuchElementException();
return header.next.element;
}

ตัวอย่างการใช้งาน
LinkedList li = new LinkedList();
li.add(new Integer(0));
Integer i = li.iterator().next();

ตัวอย่าง
// Create a Vector of String type
Vector vs = new Vector();
vs.add(new Integer(5)); // Compile error!
vs.add(new String(“hello”));
String s = vs.get(0); // No casting needed
ตัวอย่าง
HashMap map = new HashMap();
map.put(“wombat”, new Mammal("wombat"));
Mammal w = map.get(“wombat”);
แค่นี้ก่อนนะครับไม่เข้าใจถามละกันครับอาจเข้าใจยากไปหน่อยนะครับแต่ถ้าไม่เข้าใจกลับ
ไปอ่านโครงสร้างข้อมูลเรื่อง Linklist

การติดต่อ SVN google code ด้วย Netbeans


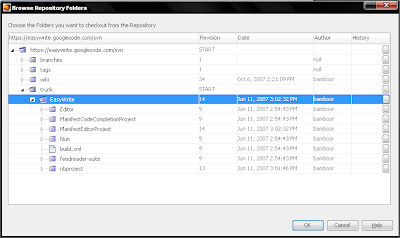
1. ขั้นตอนแรกในการติดต่อเขายัง google code ของโปรแกรม EasyWrite ใส่เหมื่อนในรูป https://easywrite.googlecode.com/svn/trunk/
แค่นี้แหละครับ

เราไปดูขั้นตอนที่สองกันครับ
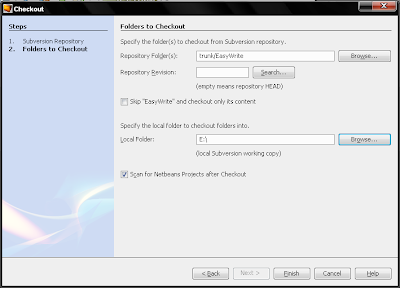
2. ก็จะขึ้นหน้าตาแบบนี้นะครับเมื่อเรากด Next
3. จากนั้นก็ Browse.. หา EasyWrite กันครับ
ให้ Browse.. ที่เก็บ โค๊ตในที่นี้ผมเลือกไว้ใน Drive E:\
ก็จะเป้นดังรูปครับ
กด Next ก็จะทำการก๊อบปี้ จาก google code มาที่เครื่องเรา

ความสามารถใน java 5.0

  • ระบบข้อมูล Generics & Metadata ซึ่งเอาไปไว้ใน ภาษาเลยเปนแบบลิ้งลิชได้กันทุกระบบตัวแปล
  • เปลี่ยน Library API ให้ใช้ง่ายขึ้น
  • การปรับแต่ง JVM ก่อนและขณะรัน
  • ระบการจัดการและสังเกตการณ์ตัวแปลขณะรัน
  • ระบบหน้าตาแบบใหม่และการจัดการเรื่อง skin ,theme
  • for loop แบบ ใหม่
    for (variable : collection)
    Old code
    void cancelAll(Collection c) {
    for (Iterator i = c.iterator(); i.hasNext(); ){
    TimerTask task = (TimerTask)i.next();
    task.cancel();
    }
    }

    New Code
    void cancelAll(Collection c) {
    for (TimerTask task : c)
    task.cancel();
    }
  • เพิ่มชนิดข้อมูลที่ชื่อว่า enum เป็นตัวแปลที่เอาไว้อ้างอิงกับข้อความหรือข้อมูลอื่นๆ
  • ใช้ printf เหมื่อนใน c/c++
    System.out.printf(“%d + %d = %d\n”, a, b, a+b);
  • สามารถ import static Class ได้และคลาส static มาตรฐานอย่าง Math
    Math.sin(x) เขียนแบบนี้ก็ได้ sin(x)
  • การรับข้อมูลแบบ คอมมานไลน์
    Scanner s = new Scanner(System.in);
    int n = s.nextInt();
    มีต่อแน่นอนครับ

วันเสาร์ที่ 6 ตุลาคม พ.ศ. 2550

Subversion การดึงและอัพเดตโค๊ตจาก google

เว็บที่เกี่ยวข้องที่สำคัญคือ เว็บใน Netbeans เอง
http://subversion.netbeans.org/
สำหรับ flash Video ของ roumen
http://roumen.name/blog/subversion2/subversion2.html
และผมเขียน บางอย่างไว้ใน
http://code.google.com/p/easywrite/wiki/loadsource

ถ้าไม่เข้าใจตรงไหน คอมเม่นได้ครับ

วันศุกร์ที่ 5 ตุลาคม พ.ศ. 2550

วิธีเพิ่มภาษาเข้าไปใน GUI ของ netbeans

วิธีการนี้เป็นระบบ มาตรฐาน i18n เพื่อให้สามารถเลือกเปลี่ยนภาษา ตามท้องถิ่นต่างๆ ได้ง่ายและสามารถเพื่อและแก้ไขได้สะดวก ยิ่งขึ้นเรามาดูวิธีกันครับ ตามลิ้งนี้จะเป็น Flash Video
ครับ ให้เราได้ทำตามได้ง่ายๆๆ ครับ
http://form.netbeans.org/JavaOne/autoi18n/autoi18n.html
แบบ ธรรมดาหน้าเว็บ
http://www.netbeans.org/kb/55/gui-automatic-i18n.html